by Dustin Williams Dustin Williams

The Power of Flexibility: Exploring the Benefits of Flexible Heating Elements

The Power of Flexibility: Exploring the Benefits of Flexible Heating Elements

Introduction

When it comes to heating systems, flexibility is key. Whether you’re looking to heat a small space, a large area, or a complex object, you need a heating solution that can adapt to your needs. That’s where flexible heating elements come in. Unlike traditional heating systems, which are rigid and inflexible, flexible heating elements are versatile, customizable, and efficient.

In this article, we’ll explore the benefits of flexible heating elements, how they work, and why they’re becoming an increasingly popular choice for both residential and industrial heating applications. From their ability to conform to complex shapes to their energy efficiency and easy installation, we’ll break down everything you need to know about these innovative heating solutions.

What are Flexible Heating Elements?

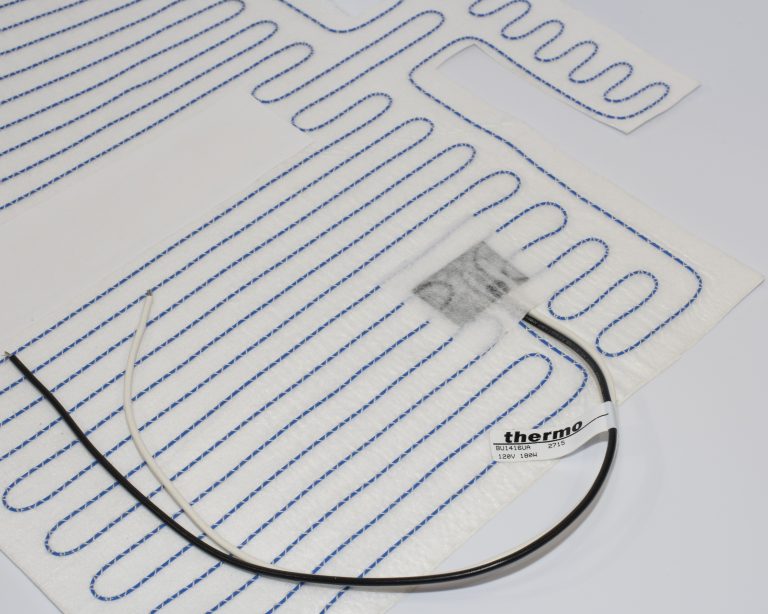
Flexible heating elements are electric heating components that are designed to be bendable, pliable, and adaptable to a wide range of applications. They can be made from a variety of materials, including silicone rubber, polyimide film, and mica, and can be customized to fit the specific heating requirements of your project.

One of the key benefits of flexible heating elements is their ability to conform to complex shapes and contours. Unlike traditional heating solutions, which are typically limited to flat surfaces, flexible heating elements can be molded, shaped, and wrapped around even the most intricate objects. This makes them an ideal choice for applications such as:

  • Heating pipes, tanks, and vessels
  • Mold and die heating
  • Medical equipment heating
  • Aerospace and defense applications

How do Flexible Heating Elements Work?

Flexible heating elements work by converting electrical energy into heat energy. They typically consist of a resistive material, such as a thin film of nickel-chromium alloy, which is sandwiched between two layers of insulation. When an electrical current is passed through the resistive material, it heats up and radiates heat outward.

The key advantage of flexible heating elements is their ability to distribute heat evenly across the entire surface of the element. This means that the entire object being heated is warmed uniformly, without the hot spots and cold spots that can occur with other heating solutions.

Benefits of Flexible Heating Elements

  1. Versatility: As we’ve mentioned, one of the main benefits of flexible heating elements is their ability to conform to complex shapes and contours. This makes them an incredibly versatile heating solution that can be adapted to a wide range of applications.
  2. Energy efficiency: Flexible heating elements are also highly energy efficient. Because they can be customized to fit the specific heating requirements of your project, there is no wasted energy or heat loss. This can result in significant energy savings over time.
  3. Easy installation: Flexible heating elements are also incredibly easy to install. They can be adhered directly to the surface of the object being heated, eliminating the need for bulky, complicated heating systems.
  4. Durability: Flexible heating elements are designed to be durable and long-lasting. They can withstand a wide range of temperatures and environmental conditions, making them ideal for use in harsh industrial settings.
  5. Cost-effectiveness: Finally, flexible heating elements are a cost-effective heating solution. Because they are highly customizable, there is no need to invest in expensive, complex heating systems that may not be suitable for your specific application.

FAQs

Q: Can flexible heating elements be used for outdoor heating applications? A: Yes! Flexible heating elements can be customized to withstand a wide range of temperatures and environmental conditions, making them an ideal choice for outdoor heating applications.

Q: Are flexible heating elements safe? A: Yes. Flexible heating elements are designed to meet stringent safety standards and regulations. They are typically constructed with materials that are resistant to fire, moisture, and corrosion, ensuring that they can be used safely in a wide range of applications.

Q: How do flexible heating elements compare to traditional heating solutions in terms of efficiency? A: Flexible heating elements are generally more efficient than traditional heating solutions, such as gas or oil-fired heating systems. They can be customized to fit the specific heating requirements of your project, ensuring that there is no wasted energy or heat loss.

Q: Can flexible heating elements be repaired if they become damaged? A: In most cases, yes. Flexible heating elements are designed to be modular and replaceable, which means that individual elements can be repaired or replaced as needed, rather than having to replace the entire heating system.

Conclusion

Flexible heating elements are a versatile, customizable, and efficient heating solution that can be adapted to a wide range of applications. Whether you’re looking to heat a small space, a large area, or a complex object, flexible heating elements can provide the flexibility and efficiency you need to get the job done. From their ability to conform to complex shapes to their energy efficiency and easy installation, these innovative heating solutions are quickly becoming a popular choice for both residential and industrial heating applications. So, if you’re in the market for a heating solution that can meet your specific needs, be sure to consider the power of flexibility with flexible heating elements.

by bigfoot bigfoot

Steer Clear of Thermal Imaging Pitfalls: Tips for Accurate Temperature Measurements and Testing of Heating Elements

Steer Clear of Thermal Imaging Pitfalls: Tips for Accurate Temperature Measurements and Testing of Heating Elements

As experts in temperature measurements and testing of heating elements, we understand the challenges that come with thermal imaging. When used correctly, thermal imaging can be a powerful tool in identifying hotspots, detecting faults, and ensuring efficient performance. However, there are several pitfalls to avoid when using thermal imaging to ensure accurate temperature measurements and testing of heating elements. In this article, we will provide tips to help you steer clear of thermal imaging pitfalls.

Understanding Thermal Imaging

Thermal imaging is a technique that uses infrared radiation to capture the temperature of objects without making physical contact. In thermal imaging, a camera detects the infrared radiation emitted by objects and converts it into an image. The colors in the image correspond to different temperatures, allowing the user to identify hotspots and temperature variations.

Thermal imaging is widely used in the heating and cooling industry for testing and monitoring heating elements, HVAC systems, and insulation. It is also used in building diagnostics to detect moisture, insulation gaps, and other faults.

Pitfalls to Avoid

Despite its many benefits, thermal imaging can be prone to several pitfalls that can lead to inaccurate temperature measurements and testing of heating elements. Here are some of the pitfalls to avoid when using thermal imaging:

  1. Inaccurate emissivity settings – Emissivity is a measure of how well a material emits infrared radiation. Different materials have different emissivity values, and it is important to set the emissivity correctly in the thermal camera to ensure accurate temperature measurements. If the emissivity setting is incorrect, the camera will produce inaccurate temperature readings.
  2. Reflections and shadows – Thermal imaging cameras can produce inaccurate temperature readings when there are reflections or shadows present. This is because the camera may detect the temperature of the reflected or shaded surface instead of the actual object being tested. To avoid this, it is important to eliminate any reflective or shaded surfaces in the testing area.
  3. Distance and angle – The distance and angle between the thermal camera and the object being tested can also affect the accuracy of the temperature measurements. If the camera is too far away or at an angle, it may produce inaccurate readings. It is important to ensure that the camera is positioned correctly and at the correct distance from the object being tested.
  4. Environmental factors – Environmental factors such as wind, sunlight, and moisture can also affect the accuracy of thermal imaging. For example, wind can cause false readings by cooling the object being tested, while sunlight can heat the camera and affect the readings. It is important to take these factors into account when using thermal imaging.

Tips for Accurate Temperature Measurements and Testing of Heating Elements

To ensure accurate temperature measurements and testing of heating elements, here are some tips to follow:

  1. Use a calibrated thermal imaging camera – A calibrated thermal imaging camera ensures accurate temperature measurements by adjusting for emissivity and other factors. It is important to have your camera calibrated regularly to ensure accurate readings.
  2. Set the emissivity correctly – Setting the emissivity correctly is crucial for accurate temperature measurements. It is important to know the emissivity of the material being tested and set the camera accordingly.
  3. Eliminate reflections and shadows – Eliminating reflections and shadows in the testing area can help avoid inaccurate temperature readings.
  4. Position the camera correctly – Positioning the camera correctly and at the correct distance from the object being tested is essential for accurate temperature measurements.
  5. Take environmental factors into account – Taking environmental factors such as wind, sunlight, and moisture into account can help avoid false readings.

Conclusion

Thermal imaging is a valuable tool for accurate temperature measurements and testing of heating elements. However, there are several pitfalls to avoid to ensure accurate readings. By following the tips outlined in this article, you can steer clear of the thermal imaging pitfalls that can compromise your temperature measurements and testing of heating elements. Understanding the technology, avoiding common pitfalls, and implementing best practices can help ensure that your thermal imaging results are accurate and reliable. By following these tips, you can improve your thermal imaging process and achieve the most accurate temperature measurements and testing of heating elements possible. Remember to always use a calibrated thermal imaging camera, set the emissivity correctly, eliminate reflections and shadows, position the camera correctly, and take environmental factors into account. With these tips, you can confidently use thermal imaging to identify hotspots, detect faults, and optimize the performance of your heating elements.

by wmcnair wmcnair

How do I estimate battery run-time for my heated device?


Overview

One of the most frequently asked questions today by innovators and entrepreneurs looking to design the perfect consumer comfort product is: can I power my gadget with a battery? This post will help you understand the requirements and challenges of using battery power to run your heated device.   It all boils down to the questions how big, how hot and how long?   Since the choices for batteries are virtually limitless, the purpose of this post is to arm you with the primary information you must have in order to consult a battery specialist, who can help you with your selection.

Let’s review the basics. Heat generation is a function of watt density, ambient conditions and thermal losses (or gains). Watt density is the amount of wattage produced divided by the area producing the wattage, referred to most frequently as watts per square inch.

A real world example:   I’ve developed a mobile warming tray and now I want to sell it to Michigan fans for football games. The tray is 8 inches x 8 inches and uses polymer thick film heater technology. I want the heater to get to about 165°F and be able run for about two and a half hours. It will be insulated, have a thermostat and needs to run off a battery. What now?

STEP 1 – Set a target temperature

When it is all said and done, establishing the maximum operating temperature of the item you are designing is the primary driver in evaluating your options. You don’t need to be dead on with this, but the more variables you consider, the more accurately you will be able to predict the outcome. Will there be thermal influences such as insulation, air flow, or large thermal masses adding or taking away from the heater’s capabilities?

For our example, let’s choose a comfortable operating temperature of 60 Degrees

STEP 2 – Estimate the Wattage

After you have determined the temperature you would like to achieve in your device, you can determine the watts per square inch that you will require by conducing some simple tests (refer to our blog post “How to determine the watt density required in my application” for instructions on conducting a simple test for this).

Another way to get a very general idea about what the wattage you may need is to look at the chart below, select a desired operating temperature and note the corresponding watt density. Note that the chart depicts heat output in open air on aluminum, so consider your environment and adjust accordingly.

Our Heated Seat Cushion will be insulated by the cushion from below (suggesting a lower watt density may be acceptable) and controlled by a thermostat (suggesting a higher watt density may be acceptable for rapid heat-up) so we’ll split the difference and begin our testing with the standard baseline for 60 degrees F. Looking at the chart below, 60F corresponds to approximately 0.5 watts per square inch.

Wattage calculation  

8 IN x 8 IN = 81 SQ IN

64 SQ IN x 0.75 WPSI = 48 WATTS  (estimated to achieve 165 degrees F in the application).

STEP 3 – Understanding Amp-hours

Determining the continuous load, or wattage, that is required is most of the battle, so now that we have a process for that, we can move on to preparing for our conversation with a battery specialist. Much like the term “watt-density” is used by heater designers, the term used in the battery world is “amp-hours.”   An amp-hour is a unit of measurement used to express a battery’s capacity over time. This is calculated by multiplying the current flow (in amps) by the discharge time (in hours).

In order to be able to calculate the amperage for our battery, you will be asked to settle on a voltage. Good news! Heaters can be designed to very wide range of voltages.

In our example, we’ll specify a 12V battery as a starting point. Remembering that wattage (P) is equal to voltage (V) times current (I)        

P = V x I   or   I = P/V

I = 48 watts / 12 volts

I = 4 amps

Logic would suggest that a 12V battery with a 10 aH rating would last about 2.5 hours when the load is drawing 4 amps, correct? Well, that’s sort of true. There are things called temperature fluctuation and Peukert’s Law that says this is not exactly true – but we’ll leave the details of this subject to the battery experts. Suffice it to say that you can always count on the battery lasting shorter than you anticipate…


STEP 4 – Consult a Battery Specialist

This is where the process gets interesting and you will need to consult with a battery specialist to determine the best combination of size, voltage and endurance for your application. Be prepared to discuss:

  • The size of the space available for the battery
  • The wattage you calculated above
  • Voltage options that work for you and your controlling devices (if necessary)
  • The minimum endurance (in hours) that you need the battery to produce.

There are thousands of combinations and technologies available, so now that you are armed with the information you need to provide your battery specialist, selecting the right battery should be much easier. If you would like to discuss your application requirements further, please call to speak to one of our Application Engineers at 864-295-4811.


by wmcnair wmcnair

Understanding Watt Density in Heater Design

Whether you are the Chief Product Development Engineer for a Fortune 500 company or an Entrepreneur with a great idea for a heated finished product, determining what you need from your heater can be a daunting task.  Fortunately, it doesn’t have to be that way. Below we will outline the steps necessary for the most time and cost effective method to answer the fundamental question about heating elements – what wattage will I need in my application?

Before we begin, it is important to note that Watt density is the central concept upon which flexible heaters are selected, designed and perform. Watt density is simply the wattage output of a heater relative to its size, typically expressed in the US in watts per square inch (wpsi). For example, a 10 inch by 10 inch heater which is 200 watts would have a watt density of 2 wpsi. All things being equal, the watts per square inch is the primary influence that determines the heaters operating characteristics in your application.

Determine Watts per Square Inch required in your application.

Step One: Establish a baseline:   Before setting up a test protocol, identify the basic performance characteristics you are looking for from the heater in your application. These typically include operating temperature, ambient conditions for the application and time required to reach the desired operating temperature.

Step Two: Recreate the environment:   As you set up your testing area, make sure to consider the actual operating environment and try to replicate that as closely as possible. For example, make sure that your test area includes adequate air-flow if the application is used in an exposed environment, or conversely, that an insulated environment is used if the heater is to be in an enclosure. Incorporate insulation, substrates and other fixtures or objects that might influence the thermal properties of the heater.

Step Three: Gather Test Equipment:   At this point, it is not always necessary to have an exact prototype made to fit your application – function is paramount.   The basic equipment needed to evaluate watts per square inch include:

  • Variable Power Supply – Required to “dial in” the required voltage.
  • Digital Multi Meter – To measure initial resistance of the heater
  • Temperature measuring devices – can also be Digital Multi Meters with thermocouple if so equipped – needed to measure surface temperature of heater and object(s) to be heated.
  • Heating Element – choose the type depending on estimated maximum operating temperature, flexibility requirements, etc. Also, get the size that most closely represents the size that will be needed, if known.   Get a lower voltage sample heater (48V or less) so that you can carefully increase the voltage beyond the design voltage of the heater. This allows you to exceed the design watt density of the sample, which may be required in your application.

Step Four: Test to find the required Watt Density:

NOTE: NEVER LEAVE HEATER OR TEST AREA UNATTENDED WHILE HEATER IS OPERATING!  

  • Make a note of the sample heater’s dimensions and initial resistance, as well as ambient temperature.
  • Incorporate the heating element as required in your application.
  • Place one thermocouple on surface of heater, the other where you would like to measure the performance in the application.
  • Place Variable Power Supply in the OFF POSITION and hook up the heater wires.
  • Put the Variable Power Supply on its lowest setting, turn on and note the input voltage.
  • Allow heater to stabilize and note temperatures.
  • SLOWLY increase Voltage incrementally until desired temperature is reached and stabilizes.
  • Note final input Voltage and Amperage (if available).


Step Five: Calculate the required watt density in your application using the following formula:

WPSI = / total square inches in the heater.


watt-density

You now have the information required to determine the basic heater performance requirements.   It is now time to contact your Applications Engineer to discuss your findings, finalize your heater options and move to the application specific prototyping stage. If you would like to discuss your application requirements further, please call to speak to one of our Application Engineers at 864-295-4811.

by wmcnair wmcnair

Understanding Positive Temperature Coefficient or PTC in Real World Applications

There has been a lot of buzz surrounding the term PTC, and for good reason. The primary interest revolves around the basic question – “can I eliminate a thermostat if I use a PTC heater?” Well, the answer is yes, maybe. First, let’s review the basic characteristics of PTC heating technology.

PTC technology offers a unique set of performance characteristics such that, when the temperature of the heater is high, the wattage is reduced and vice-versa.   In other words, PTC heaters power themselves down to a minimum operating wattage to prevent overheating, often eliminating the need for external over-temperature controlling devices such as a thermostat or thermal fuse.   As an example, and depending on the design, a 12 volt 30 watt heating element at -10°C may self-regulate to approximately 15 watts when the heater reaches 55°C, and continue regulating down to 8 watts at 65°C.

As you can see from the Resistance Magnification Factor graph above, the positive increase in resistance is accelerated at higher temperatures, providing the desired over-temperature protection.

Many Product Design Engineers then ask, “can we dial in the curve to regulate the heater at a lower temperature?” Unfortunately, that capability is not yet available, but you can design to a desired “equilibrium” temperature.   An equilibrium temperature can be achieved by identifying the wattage at a given ambient temperature that is required so that the heater itself stabilizes at that temperature. (For more information about how to determine this, see our Blog Post “How to determine the wattage needed in my application”).

 Understanding PTC in Real World Applications

Determining whether PTC is right for your application

Now that the technical information is behind us, consider the following key factors to help determine if PTC is the right choice for your application:

  • Rapid Heating:   If you are looking for maximum wattage output at lower temperatures, PTC heaters have the lowest resistance at startup, providing that extra kick start before regulation begins.
  • Uniform heat: If even heat distribution is important to your application, PTC heating elements provide the maximum heat producing surface. They are designed using wide-geometry circuits, meaning they employ hundreds of miniature resistors, spaced as needed across the heater surface.
  • Light Weight and Easy to install: PTC heaters are screen printed on a polyester substrate with a peel and stick adhesive back, ultra-thin and very light weight.
  • Operating Temperature: If the operating temperature of the heater in the application is 80°C or below, PTC may be a viable option. Above 80°C, the self-limiting properties of PTC will, in effect, regulate the heater down.
  • Self-Regulation: The self-regulating properties of PTC inks are non-specific, meaning that it is not possible to dial in a precise “shut-off” temperature. If a precise shut-off temperature is required, a thermostat or other external controlling device may be added.
  • Voltage Requirements: PTC inks are primarily designed for lower voltage applications (below 48V), but with adequate development and testing, higher voltages may be achievable.

In summary, the self-regulating properties of PTC heaters provide a thin, light weight solution with a unique built in safety feature, uniform heat distribution and maximized ramp-up capabilities. If you would like to discuss the benefits of evaluating PTC heating technologies in your application, please call to speak to one of our Application Engineers at 864-295-4811.